Introduction
Beeswax is one of nature’s most versatile and valuable gifts from the hive. For centuries, it has been used in candles, cosmetics, wood polish, balms, and even food wraps. As a beekeeper, learning to harvest your own beeswax not only reduces waste but also adds a profitable byproduct to your beekeeping practice.
This guide walks you through everything you need to know — from collecting cappings to cleaning and storing pure, golden beeswax.
What Is Beeswax and Why Is It Valuable?
Beeswax is a natural wax secreted by worker bees from special glands on their abdomens. They use it to build the honeycomb structure that stores honey, pollen, and brood.
Each kilogram of beeswax requires bees to consume about 8 kilograms of honey, making it a highly valuable material.
It’s prized for its:
- Purity – 100% natural and chemical-free.
- Durability – Doesn’t spoil and resists mold.
- Versatility – Used in cosmetics, candles, and sustainable packaging.
- Aroma – Has a pleasant honey-like scent.
When to Harvest Beeswax
The best time to harvest beeswax is during or after the honey harvest season — typically late spring to early fall, depending on your region.
Look for:
- Fully capped honey frames
- Old combs being replaced
- Excess burr comb or cappings after extraction
Avoid harvesting during rainy or humid periods, as the wax may retain moisture and impurities.
🧰 Tools and Equipment You’ll Need
| Equipment | Purpose |
|---|---|
| Hive tool | To lift frames and scrape wax |
| Uncapping knife | To remove wax cappings |
| Honey extractor | To separate honey from wax |
| Double boiler / solar wax melter | To melt beeswax safely |
| Fine strainer or cheesecloth | To filter impurities |
| Molds or containers | To pour and store wax |
| Protective gloves | Safety when handling hot wax |

Step-by-Step: How to Harvest Beeswax
Step 1: Prepare Your Work Area
Set up a clean, dry area for harvesting. Beeswax can be messy, and honey attracts insects — so choose a space away from the main hive area.
Cover surfaces with paper or cloth to catch drips. Have your melting equipment and strainers ready.
Step 2: Remove the Honey Frames
Remove honey frames that have fully capped cells. Use a bee brush or leaf blower to gently clear bees off the frames.
Avoid brushing too hard, as this can damage the wax caps.
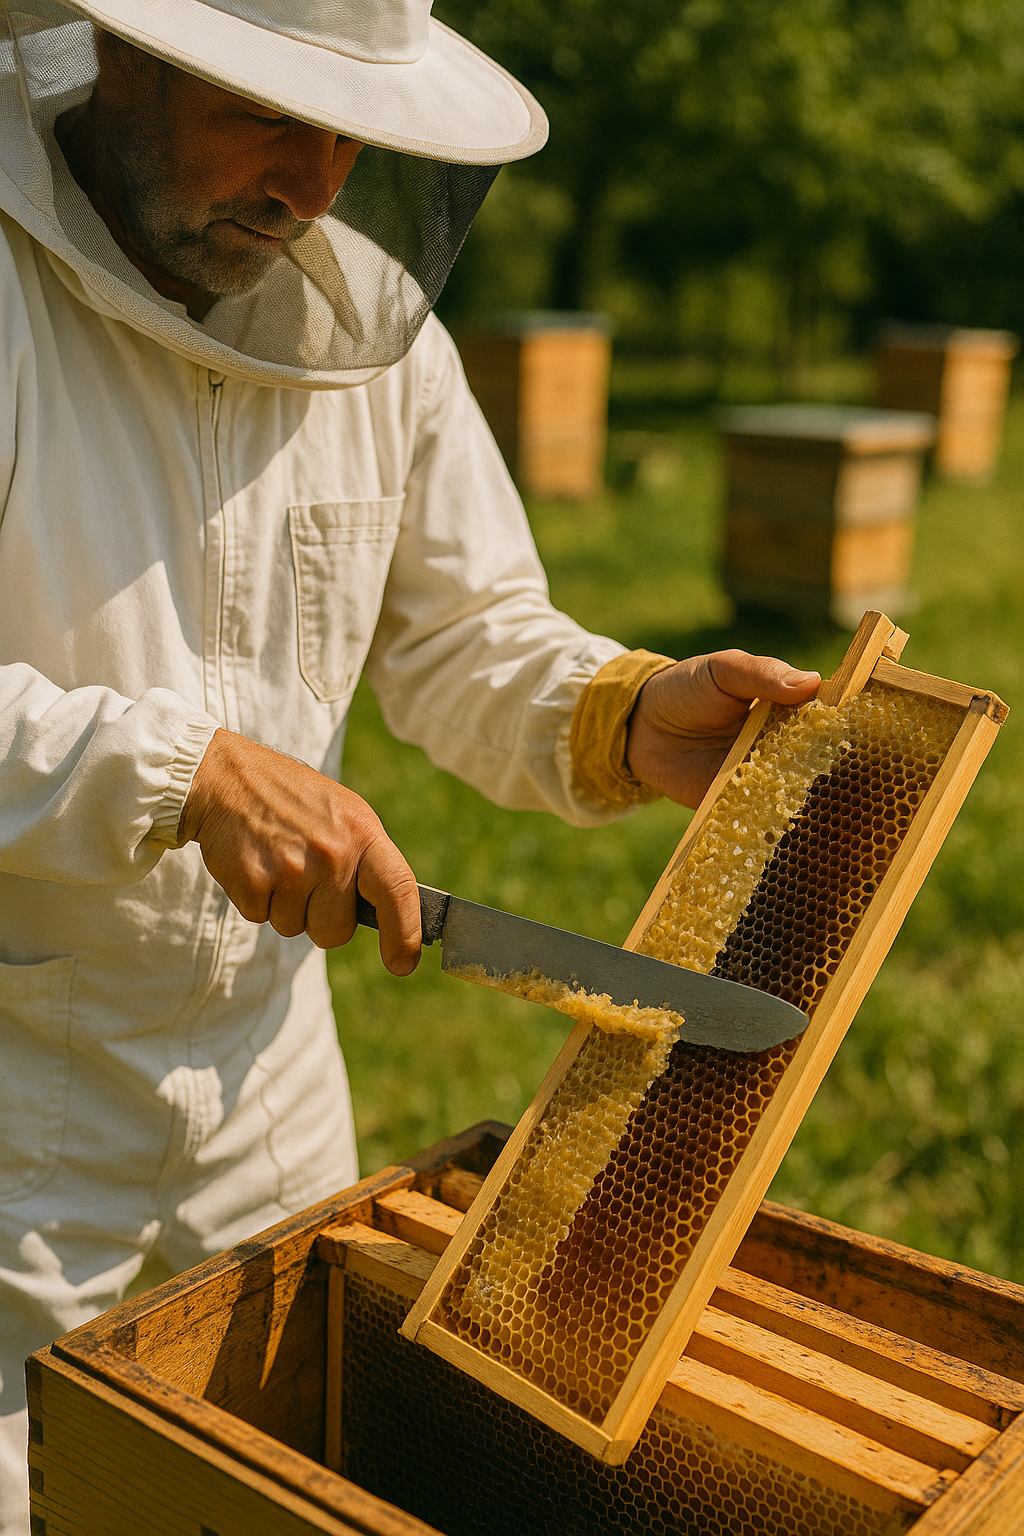
Step 3: Uncap the Honeycomb
Use a heated uncapping knife to slice off the wax cappings that seal the honey cells. Collect these cappings in a separate container — this will be your raw beeswax.
💡 Tip: Don’t throw away burr comb or leftover pieces — they also yield usable wax.
Related Articles
🍯 Related Articles
Step 4: Extract Honey and Collect Cappings
Place the uncapped frames into a centrifugal honey extractor.
The spinning motion removes honey but leaves the wax structure intact.
The leftover wax cappings can now be drained, rinsed, and prepared for melting.
Step 5: Rinse and Filter the Wax
Rinse the cappings lightly in cool water to remove honey residues. Let them air dry on a mesh surface or cloth for several days.
Once dry, melt them in a double boiler or solar wax melter at around 65°C (150°F). Never use direct heat — beeswax is flammable.
Step 6: Melt and Clarify the Beeswax
Pour melted wax through a fine mesh or cheesecloth into a clean container to remove impurities like bee parts or propolis.
For a second purification, reheat the wax and filter again.
The cleaner the wax, the brighter and smoother the final product.

Step 7: Pour and Store the Wax
Pour the filtered beeswax into silicone molds, glass jars, or metal tins.
Allow it to cool slowly at room temperature to prevent cracking.
Store in a cool, dry, dark place. Properly stored beeswax can last for decades.
Tips for Clean and Pure Beeswax
- Use clean tools and containers to avoid contamination.
- Filter wax twice for clarity.
- Add a few drops of water to the melting pot to catch dirt at the bottom.
- Don’t overheat — beeswax loses its aroma above 85°C (185°F).
Common Mistakes to Avoid
| Mistake | Result |
|---|---|
| Overheating wax | Burns and discolors beeswax |
| Using direct flame | Fire hazard |
| Filtering only once | Impurities remain |
| Storing in damp places | Mold and odor issues |
| Harvesting dirty comb | Contaminated wax |
How to Store and Use Beeswax
Store beeswax in airtight containers or wrap it in wax paper. Keep away from direct sunlight and heat.
Popular Uses of Beeswax
- Candle making
- Lip balm and body lotion
- Beeswax wraps for food storage
- Wood and leather polish
- Soap making
- Furniture restoration
FAQ: Harvesting Beeswax
Q1: How much beeswax can I get from one hive?
A typical hive yields 1–2 kg of beeswax per season, depending on colony strength.
Q2: Can I reuse old combs for beeswax?
Yes, but dark combs should be replaced periodically to prevent contamination and disease spread.
Q3: How do I know when wax is clean enough?
Pure beeswax is bright yellow or golden, solid when cool, and free of debris or cloudy spots.
Q4: Can I sell beeswax?
Absolutely! Beeswax is in high demand for natural skincare, candle-making, and crafts.
Conclusion
Harvesting beeswax is one of the most rewarding parts of beekeeping. Not only do you get beautiful, natural wax for candles and balms, but you also make full use of your hive’s potential.
By following these steps — from collecting cappings to melting and filtering — you’ll master the process and produce your own high-quality beeswax safely and sustainably.
Beekeeping isn’t just about honey — it’s about creating balance, sustainability, and appreciation for nature’s intricate design.

